increased resilience to the stress of pollutants, temperature fluctuation and drought
The atmosphere has 340 ppm (parts per million) of CO2. That is 0.0036%
Plants breathe in carbon dioxide and breathe out oxygen
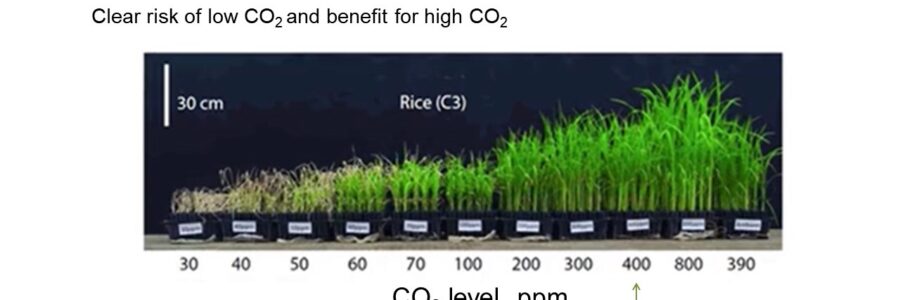
Plants benefit from CO2 increases up to 2000ppm
The optimum level of CO2 for most plants is between 800 and 1350 ppm
90% of growth increase is obtained with the first 1000 ppm of CO2 in the atmosphere
One cubic metre at 1000 ppm contains one litre of CO2
Every cubic metre must have between half and one litre of CO2 added to optimise CO2 level
If you add one litre of gas to a cubic metre of air, the CO2 level will be (1000 + 340) = 1340 ppm
Optimal temperature is 21 to 27 degrees
Growth rate slows markedly if the ambient temperature rises above 35 degrees or falls below 21 degrees
When the temperature reaches 35 degrees, the benefits of CO2 enrichment become zero
Excessive heat reduces the ability of the plants to absorb CO2
The only air conditioner suitable is a refrigerant one. Set to recycle, not draw in from outside. An evaporative air conditioner will absorb CO2 from the air, wasting it
Levels above 2000 ppm are detrimental and become toxic to plants
Work-safe recommends humans are not exposed to 5000 ppm (averaged) over an eight hour period. Plants begin to die at this level
Properly seal room (especially around the extraction fan) so CO2 won’t escape through leakage
Set your CO2 unit to come on before the light switches on and to turn off just as the light switches on. When the light comes on, the room will contain optimum CO2 in the air that the plants can use immediately
Place your CO2 unit on a shelf, desk, cupboard etc. Never sit your unit on the floor
in hydroponics, plants uptake nutrients that are dissolved in water rather than nutrients available in soil. Most of the time, these nutrients are provided to the plant in an ionic or inorganic form. In order to grow healthy hydroponic crops, it is essential that growers maintain proper electrical conductivity (EC) and pH levels.
For most hydroponic crops, the ideal range of EC for most crops is between 1.5 and 2.5 dS/m. A higher EC could prevent the plant from absorbing nutrients due to increased (more negative) osmotic pressure, and EC levels that are too low could adversely impact yield.
What is EC?
In hydroponics, electrical conductivity (EC) is a measure of how easily electricity can pass through your nutrient solution. Similarly, the conductivity factor (CF) is a measure of EC with units of millisiemens per centimeter (mS/cm).
Most plant nutrients are available as soluble ionic compounds. Ions are charged particles. Adding more of these charged particles will increase the EC of a nutrient solution.
Units of EC
In order to be able to read and interpret EC readings taken from your nutrient solution, it is important to understand the units used to measure EC.
EC is typically expressed as siemens per unit area (e.g., mS/cm, dS/m, S/m). For a nutrient with a conductivity of one S/m, the electric current through a nutrient solution will increase by one ampere for every increase of one volt of electric potential across one meter of solution.
Various metric prefixes are used when expressing EC readings. The table below lists some of the common prefixes used for EC.
Converting EC to ppm
As previously discussed, EC is a direct measurement of the electric conductivity of a substance. Because the nutrients dissolved in the water used for hydroponics are ions, EC can also be used as an indirect measurement of total dissolved solids (TDS). TDS is measured in parts per millions (ppm) and represents the concentration of nutrients in the solution.
EC Ranges By Hydroponic Crop
Not every plant has the same optimum EC value. There are a number of reasons for this. First, different plant species have different nutritional needs. The amount of nutrients in the nutrient solution impacts EC levels.
The optimal EC also depends on the plants’ stage of growth. Seedlings prefer nutrient solutions with a lower concentration of nutrients (lower EC) because they can burn easily. In contrast, more mature plants should be grown in nutrient solution with a higher EC.
In addition, environmental factors such as the ambient air temperature are important in determining the optimum EC. For example, when the ambient air temperature is above 86°F (30°C), EC levels should be reduced to account for the reduction in the plant’s rate of photosynthesis.
The optimum range of EC values for different hydroponic crops is listed in the following table.
Crops
EC (dS/m)
Asparagus
1.4 to 1.8
African Violet
1.2 to 1.5
Basil
1.0 to 1.6
Beans
2.0 to 4.0
Bananas
1.8 to 2.2
Broccoli
2.8 to 3.5
Cabbage
2.5 to 3.0
Celery
1.8 to 2.4
Carnation
2.0 to 3.5
Cucumber
1.7 to 2.0
Eggplant
2.5 to 3.5
Ficus
1.6 to 2.4
Leek
1.4 to 1.8
Lettuce
1.2 to 1.8
Pak Choi
1.5 to 2.0
Peppers
0.8 to 1.8
Parsley
1.8 to 2.2
Rhubarb
1.6 to 2.0
Rose
1.5 to 2.5
Sage
1.0 to 1.6
Spinach
1.8 to 2.3
Strawberry
1.8 to 2.2
Tomato
2.0 to 4.0
Zucchini
1.8 to 2.4
The Impact of EC On Plant Yield
So what is the impact of growing plants in a nutrient solution with EC levels that are above or below the optimum range?
A research study that examined the effects of EC on tomato yield found that yield increased as the EC of the nutrient solution increased from 0 to 3 However, the yield decreased when the EC was further increased from 3 to 5 . Researchers found that EC levels between 1 and 3 , depending on the stage of growth, resulted in higher tomato yields.
Symptoms of Excessive EC
Ironically, signs of excess nutrients are similar to the symptoms of nutrient deficiencies in conventional growing systems. For example, excess magnesium in a hydroponic system looks just like calcium/magnesium deficiencies in growing media.
In general, here are some signs that the EC of your nutrient solution is too high.
Leaf and stem wilting
Tip burn
Stunted growth
Dropping leaves
Note that many of these symptoms may also indicate other problems such as disease, lack of water, too much heat, or excessive light.
If you suspect that the EC of your nutrient solution is too high, dilute it with distilled water. As you are adding distilled water, take measurements intermittently until the EC is back to appropriate levels.
Measuring EC
The average daily water loss in a hydroponics system ranges from 5% to 30% depending on the size of the system and the type of plants you are growing (. This water loss results in a nutrient solution with a high EC. This means you should be measuring the EC of your system on a regular basis.
EC Meters
There are a variety of EC meters available at different price ranges. So what should you look for when searching for an EC meter? Depending on your budget, you will want an EC meter that is waterproof, has a battery life indicator, is easy to use, has an automatic shutoff, is shockproof and is easy to calibrate.
The most popular brands of EC meters are Bluelab, Hanna & Essentials,. starting at $180
Keep in mind that cheap TDS meters tend to be less accurate than some of the more expensive EC meters. starting at $50
Larger grow rooms require higher-quality EC meters. An example of such meter is the Bluelab BLU27100 Guardian Monitor. This monitor costs between $550 and $650 and has alarms that alert you if your EC gets too high or too low.
Calibration and Cleaning EC Meters
If you consistently use your EC meter, salts will build up on the meter. This salt buildup can skew your readings and shorten the life of the EC meter. For this reason, it is important to calibrate your EC meter before taking readings. You should also clean your meter after every us
You can hardly wait to get started with your hydroponic system. You’ve researched light, spacing, and nutrient requirements for your plants. Don’t forget one of the most important factors in hydroponics: pH levels. If the pH level is too high or too low, plants cannot absorb nutrients and will not thrive in otherwise ideal conditions. Read on to learn the role of pH in hydroponic systems and how to properly monitor and maintain its levels.
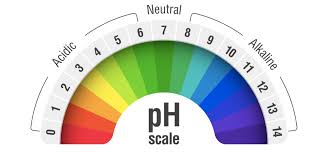
A pH test shows whether a substance is acidic or alkaline. The pH scale ranges from 0 to 14, with 0 being the most acidic, 14 the most alkaline, and 7 is the pH-neutral point. Some plants prefer acidic conditions while others require an alkaline environment. There are many methods available for testing and adjusting pH levels in hydroponic systems.
Why pH is Important in Hydroponic Systems
The right pH level is crucial because it affects nutrient availability for your growing plants. A pH level that is too high or alkaline can prevent nutrient uptake and lead to deficiencies. Iron deficiency causes pale or yellow leaves in young plants, while leaf cupping and tip burn are telltale signs of calcium deficiency. Calcium can also form salts that leave white deposits or scale on reservoir walls and equipment.
Hydroponically grown plants need different pH levels than plants grown in soil. Without soil, plants do not benefit from microorganisms, organic matter, and interactions between water and minerals that regulate pH levels. The hydroponic gardener must constantly monitor and adjust pH levels. Make sure that you do not apply pH recommendations for soil-grown plants to hydroponically grown plants.
Typical pH Ranges for Crops
With some exceptions, the optimal pH range for hydroponically grown crops is generally between 5.5 and 6. Many fruits and vegetables, such as melons, apples, beans, squash, and tomatoes prefer that range. Blueberries, on the other hand, need a lower, more acidic pH between 4.0 and 5.0. It’s a good idea to use separate nutrient reservoirs for plants with similar pH ranges.
Some hydroponic crops have a wide optimal pH range. Pumpkin, for example, will thrive in a pH between 5.5 and 7.5. Crops that require alkaline conditions include kale, onions, and peas, which prefer pH levels between 6.0 and 7. Mint plants tip the scale at an optimal pH range of 7.0 to 8.0.
Typical pH Ranges for Nutrient Systems
Hydroponic nutrient products typically start with pH levels between 5.5 and 6.0, the optimal level for most crops. The pH range, however, depends on the specific formulation. For example, ammonium nitrate has a more acidifying effect than nitrate and will cause a drop in pH. Calcium salts, on the other hand, cause a rise in pH, resulting in a more alkaline solution.
Specific nutrients require certain pH levels for plant uptake. The wrong pH level can result in too little or too much of certain nutrients. For example, when the pH level drops below 5.0, plants can develop magnesium and calcium deficiencies or copper and iron toxicity. A pH level above 6 or 6.5, however, can cause iron deficiency.
Why pH Levels Change in Hydroponics Systems
Several factors can cause pH levels to change in hydroponic systems. When the amount of the nutrient solution drops below one gallon, the solution becomes more concentrated as plants absorb the nutrients. This results in widely fluctuating pH levels. It is, therefore, important to monitor nutrient solution levels, keep the reservoir full, and regularly test the pH in the reservoir.
Both inorganic and organic matter can affect pH levels in hydroponics systems. For example, gravel and other inorganic growing media act as a buffer and cause pH levels to rise in media-based systems. In a natural environment, soil acts as a buffer in a similar way. To get an accurate pH reading in a media-based system, test the pH of the reservoir solution as well as the solution (leachate) that drains from the beds or bags that hold the plants.
Algae and bacteria are the main types of organic matter that affect pH levels. If pH levels rise in the morning and drop later in the day, algae may be the culprit. As algae consume acidic carbon dioxide during the day, pH levels rise and then fall by evening. On the other hand, bacteria from root disease can cause a dramatic drop in pH levels. As diseased roots decompose, bacteria will release acids into the hydroponic solution.
How to Maintain the Right pH Levels
The first step in maintaining the right pH levels is testing. A variety of testing supplies are available. Test strips and liquid test kits are the least expensive and are available at pool supply stores and garden centers. Digital pH meters are more accurate and offer repeatable results. You should test frequently with whatever hydroponic testing instruments you choose, even daily if you have recently adjusted nutrient levels or have little experience with hydroponics.
If you use a recirculating system, adjust the pH level according to test results from the supply reservoir. In a media-based system, however, the pH changes as the nutrient solution travels from the supply reservoir and out through the grow base. Adjust pH levels based on the pH of the leachate that drains from the grow beds.
Commercially prepared “pH up” and “pH down” products are available to maintain the right pH levels. You can purchase these products in dry or liquid form and use them according to label instructions. Make sure you use products that are formulated for hydroponic systems. For small systems or short-term results, you can add weak acids such as vinegar or citric acid.
Automatic pH controllers cost more than pH up or pH down products but they keep the pH at consistent levels. This option works best in recirculating systems to prevent pH fluctuations that occur as plants feed.
If your water is hard, the buffering effect of the high mineral levels will cause high pH levels. A reverse osmosis system is an efficient and relatively affordable method for reducing water hardness.
Benefits of Measuring and Maintaining pH Levels
Each plant needs certain growing conditions to thrive. It’s worth the time and effort to monitor and adjust pH levels in hydroponic systems. If you know the optimal pH ranges for your plants, you can take the necessary steps to keep your hydroponically-grown plants healthy.
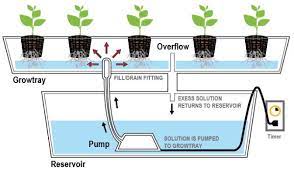
The Flood and Drain System is an excellent growing system suitable for many types of plants from fast growing vegetable crops – long term flower crops.
So how does the Flood and Drain system work?
It operates with an irrigation system that floods the grow tray with nutrient solution from the reservoir hidden underneath. The nutrient solution floods the tray for a short period of time then drains back to the reservoir.
The benefit to this system is that it can work off a timer. Set and forget!
What’s the best medium to use?
There are many types of medium that work well with the Flood and Drain
Clay Balls
Perlite or Perlite / Vermiculite mix
Clay balls can be used straight into the tray and used as a garden bed or you may choose to plant in pots and use the clay balls as the grow medium. Clay balls allow for excellent aeration of the plant roots.
If choosing to use Perlite its best to plant in pots.
Flood and Drain Kit Comes complete with :
Grow tray (Various sizes avail, 1050 x 1050 most common)
Aluminum Stand
Irrigation fittings / plumbing
68 Litre reservoir
Water pump
24 hr Timer
Clay balls
Nutriflo Grow Nutrient
NB : You can expand your Flood and Drain System and have 2 or 3 grow trays connected to the existing reservoir and pump.
CHOOSE YOUR LOCATION:- When you choose a location for seed starting, make sure the environment will be ideal for your seedlings. A warm spot inside your home such as an unused closet a growroom, grow tent, or greenhouse are all ideal options. You will be playing the role of Mother Nature and are in control of monitoring and adjusting your environment. You need to choose a location that is about 23°C, with relative humidity between 40-60 percent. Your location will also need enough space for all your seedlings as they grow, plus equipment such as grow lights, a fan, and a dehumidifier. Keep in mind the temperature will be affected by your grow lights, heat mats, and other equipment. Your humidity will be affected by the number of plants growing. The more equipment you have, the higher the temperature and the more humidity you potentially burn off. The more plants you have, the more moisture will be produced from transpiration and evaporation. You’ll need to adjust the different parts of your growing area to create an ideal environment.
GATHER YOUR SUPPLIES In order to create this environment, you’ll need to gather some supplies. Fluorescent grow lights work well for seed starting, although you may need more powerful lights as your crops get older. A sunny window probably won’t produce enough light. Plug your grow lights into a timer to control when they turn on and off. A heat mat and humidity dome or plastic wrap will help you keep your seed-starting medium moist and warm. If you want to control the exact temperature of your heat mat, you can buy a temperature controller, but I don’t find that is usually necessary. You’ll need a thermometer/hygrometer to monitor the temperature and humidity inside and outside the dome, a dehumidifier to maintain the proper humidity level, and an oscillating fan to create air flow, which keeps fungal diseases at bay and strengthens the young seedlings. You’ll also need to gather trays, starter cubes, and, of course, the seeds you’ll be starting. Make sure your trays and domes are cleaned and sanitised in order to prevent disease from spreading through your garden.
CHOOSE YOUR MEDIUM Germinating seeds for your hydro system is a lot like starting seeds for any other garden. The main difference will be the growing medium you use. In a hydroponic system, it’s best not to use a loose medium and opt for a starter cube instead. This way you don’t contaminate your system and clog your emitters. Starter cubes are also easier to add to any system without stressing the plants. Starter cubes are made out of many different types of materials, including stonewool, peat moss, coconut coir, sponges, and foam. Each type of plug has pros and cons, but what is most important is that the plug can remain moist while having an air-to-water ratio that promotes root growth. Some plugs are treated with micronutrients or beneficial bacteria to jump start root growth from the very beginning. Others, like stonewool, need to be treated before use to adjust their pH. Once your seedling is 10-15cm tall and has its true leaves, you can easily place the cube into your hydro system without stressing your plants. Starter cubes are flexible and work well alone in net cups, in clay pellets or gravel, and in sterile soilless mixes.
PREPARE YOUR SEEDS Different seeds have different requirements for seed starting. Some need to be soaked overnight or placed in the refrigerator for a couple of weeks prior to planting. Others need to be nicked or scratched to allow the plant to escape the seed pod. Get to know the seeds you’ll be growing and how to grow each kind of crop. You’ll also need to understand the timelines for your plants and plan your indoor garden accordingly. Grow plants with similar growing requirements together. If they grow in your outdoor garden at the same time, chances are they will grow well together indoors too. You may want to check your seeds’ viability before planting, especially if your seeds are a few years old. Seeds can last from one to five years or longer, depending how well they were stored. To test your seeds, place 10 or more in a wet paper towel, in a closed plastic bag, and place the bag in a warm location. If only a couple of your seeds germinate, they probably aren’t worth the effort and you should invest in a new packet of seeds.
PLANT YOUR SEEDS Before planting, prepare your starter cubes by soaking them in distilled water for a couple of hours and then drain the water. To plant your seeds, place two to three in the hole on top of the starter cube and then cover. The general rule of thumb is to plant seeds as deep as they are long. Some very small seeds, such as celery and dill, should be surface sown because they need light to germinate. Keep your medium warm and moist by covering your tray with a dome or plastic wrap and then place it on a heat mat. Most seeds germinate between 18-24°C, however, each seed has its own ideal temperature. If the soil temperature isn’t right, it can take longer for seeds to germinate, or they may not pop at all. For example, peppers will germinate in eight days at 30°C, but take almost two weeks at 15°C. Eggplants, melons, pumpkins, squashes, and tomatoes all have optimum soil temperatures between 26-35°C. You can adjust the soil temperature with a heat mat and temperature controller and monitor your results with a soil thermometer. Once they break through the soil, the seeds will also need the environment to be the correct temperature, which is different for different plants. You may need to plan to germinate cool-weather and warm-weather crops at different times for best results.
CARE FOR YOUR SEEDLINGS Once your seedlings appear, you can gradually remove the dome or plastic wrap to lower the humidity directly around them. Each type of plant has its own preferences for humidity, but in general the humidity level should be higher during the seedling and vegetative stages. Be sure to water your seedlings on a regular basis but be gentle. You can use a spray bottle to mist the soil, or water from the bottom so you don’t disrupt the tiny roots. You don’t want your starts to dry out, but you also don’t want them to be too wet to breathe. Once the true leaves appear, start adding a quarter- to half-strength fertiliser to your water. Position the fluorescent grow lights about 5 centimetres above your seedlings and turn them on 16-24 hours per day. Fluorescents are not strong enough to burn your plants when they are this close. However, if you raise your lights too high, your seedlings may get leggy as they stretch to reach the light. If you do schedule your lights to turn off at night, keep in mind that will lower the temperature in the room, which may or may not be okay for the plants you’re growing. Soon you’ll see roots start to pop out from the bottom and sides of the starter cube. Once your plant is a few inches tall, has a few leaves, and has healthy roots growing out of the cube, you can place the seedling into your hydro system. I like to treat my seedlings with a preventative neem oil treatment before adding them to my growroom. Pests are especially hard to eradicate indoors and preventing them is much easier than treating an infestation. Once you get the basics down, it is easy and rewarding to germinate seeds for your hydroponics system. Your plants will be cleaner, healthier, and experience less stress at transplant time, which means you’ll have a happier garden right from the beginning.